Adobe Audition Lab

CREATING A PODCAST

PRODUCE A PODCAST USING ADOBE AUDITION

Learning Objectives

By the end of this lab, you will be able to:

  1. share tips on recording quality sound files for your podcast
  2. use enhancement tools in Audition to improve the quality of your recordings
  3. build a multitrack podcast file in Audition
  4. use ducking to ensure your dialog track is not drowned out with music tracks
  5. export a multitrack session to create a single wav or mp3 file
  6. publish your podcast using Adobe Audition

Downloadable Files

If you wish to follow along with the instructional videos, download and extract the zip file containing sound files and a text file.


RECORD YOUR AUDIO AND COLLECT YOUR SUPPLEMENTAL FILES

Before you record your audio files, it is good to have a plan. Where will you record? Do you need any special equipment to record quality audio files? Where can I find music files and special effect files to supplement my sound files? This first video answers all of these questions and more so you can get started fast.
recording your podcast

As always, the assignment will vary from professor to professor, but minimum requirements will have you recording your blog as a sound file and having you incorporate music and sound effects into your completed podcast. Here are some excellent sources of creative commons music files and sound effects:

  1. soundimage.org
  2. soundbible.com
  3. mixkit.co
  4. freesound.org* - requires free account

RECORDING TIPS

Here are some tips on recording high quality material from home using a smart phone or stand alone microphone:

  • Hardware Selection

    A standard smartphone microphone is sufficient for this assignment. A pop filter is a supplemental piece of equipment worth buying to improve recordings.

  • Room Selection

    Find a quiet room. Rooms with little glass and tile will help reduce bouncing sound. Fan noise and other constant background noises are bad too!

  • Voice Control

    Standing while recording often improves quality. Do multiple takes, be engaging, and experiment with microphone location to reduce plosives.

  • Do Some Prep Work

    Take some time to plan your podcast. Use the sites in the above section to supplement your recordings with music and special effects to help make it stand out.


ENHANCE AUDIO USING AUDITION EFFECTS

There is an excellent chance your audio files will not be ready for prime time straight out of your smartphone. Audition has many easy to use effects and presets you can utilize to improve your audio. This video shows you how to use those effects. You can find the files used in the Audition lab videos at the top of this lab in the section titled *downloadable files*
enhance audio files

Key Points From Video

  1. The DeNoise effect will lower or eliminate background noise from your file. If you have fan noise, air conditioning noise, or any other constant noise in the background, this effect should help you. Access it by clicking Effects...Noise Reduction/Restoration...DeNoise and adjust the slider while playing your file to find the sweet spot for removing noise from your file.
  2. The DeEsser effect removes those ssss sounds made during recording. Access this effect by clicking Effects...Amplitude and Compression...DeEsser. You can try using one of the drop down presets for low/male and high/female voices, but for a deeper dive into this tool, check out this in depth tutorial.
  3. The Parametric Equalizer tool can drastically enhance your dialog track for your podcast. To access, click on Effects...Filter and EQ...Parametric Equalizer. You have total editing control over every frequency and this tool comes with some decent presets. As a starting point, you might want to try the Vocal Enhancer preset. Be sure to follow along with the training video, but you can check out more information about this tool by visiting Adobe's help page.
  4. Do you have portions of your audio that are way too loud while others are just too soft and you wish your file could just have more consistent volume levels? If so, the Single-band Compressor effect is a tool for you to try. Access it by clicking Effects...Amplitude and Compression...Single-band Compressor. A solid preset to use as a starting point for your podcast is the Voice Over preset, but there are many others to try. In addition to the video content, you can read up on the Single-band Compressor on Adobe's website.
  5. The Hard Limiter effect ensures audio will not rise above a certain decibal level that you set. To access this effect, click Effects...Amplitude and Compression... Hard Limiter. Presets worth trying are the -6 and -3 presets. You can read up on this effect and the different variables on Adobe's website.
  6. The Normalize effect allows you to bring up the levels of your audio file evenly. If the highest peak is currently -6 dB and you normalize to -3 dB, every part of your audio file will rise 3 dB. To access this effect, click Effects...Amplitude and Compression...Normalize. You can read up on this effect and the different variables on Adobe's website.

BUILD YOUR PODCAST

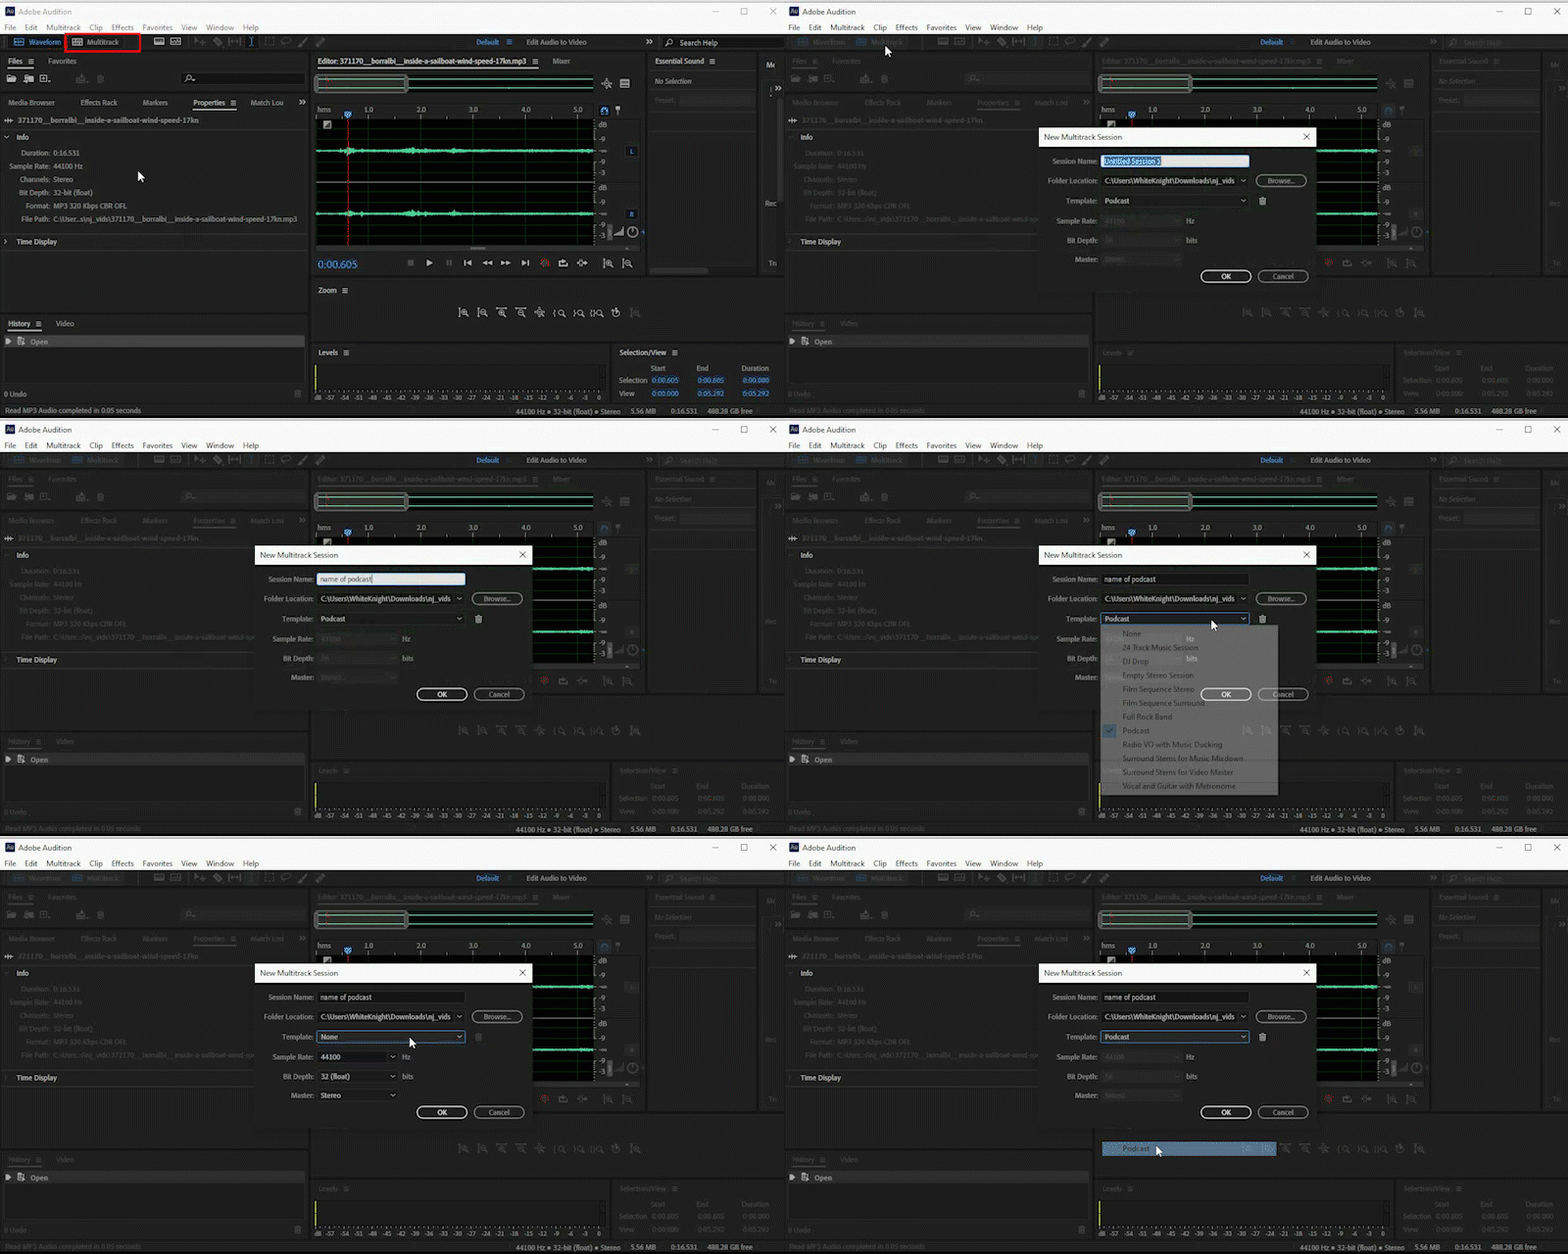
Once your recorded files are edited in Audition, you are ready to build your podcast by starting a multitrack session where each of your files are placed on a track. This video will show you how to start your session, bring in the files, and make edits to improve the overall sound of your podcast. You can find the files used in the Audition lab videos at the top of this lab in the section titled *downloadable files*
build your podcast

Key Points From Video

  1. Gather and edit the supplemental audio files downloaded from sites offering creative commons files.
  2. Start your multitrack editing by switching from waveform to multitrack.
  3. start multitrack session
  4. Position files on tracks and assign a tag to each clip. This is discussed starting at the 10 minute mark of the video.
  5. Use ducking for the music track to ensure your dialog track can be heard and understood when both files are playing simultaneously. This technique is discussed starting at the 10:30 mark in the video.
  6. Take advantage of your ability to fade clips in and out when it helps improve the quality of your podcast. Fading is discussed starting at the 20:15 mark in the video.
  7. Once each track is positioned and everything is ready to go, export the multitrack session as a single file by clicking File...Export...Multitrack Mixdown...Entire Session. To keep file sizes low and the number of devices that can play your file high, exporting as an MP3 is a good idea.

POST YOUR PODCAST TO PORTFOLIO

You have your completed podcast audio file and it is time to post it to Portfolio as an assignment. This video will take you through each step from creating a new work page in your collection to uploading your podcast file so Portfolio can process it. You can find the files used in the Audition lab videos at the top of this lab in the section titled *downloadable files*
post your podcast

Key Points From Video

  1. Once you create a new page in your work collection to hold your podcast assignment, you will use the audio module to upload your sound file.
  2. When you upload your file using the audio module, you are sending that file to Adobe's server. The server will process your file so it plays when anyone visits your page. This processing usually take a couple of minutes, but it could take longer, so do not wait until just before your assignment deadline to upload.
  3. In addition to the audio module, this page will need a text module for any written content (your citation) and perhaps an image module should you wish to add a graphic.
  4. Speaking of graphics, do not forget to add a cover image for this assignment on the work page. By now, you should be an expert on how to do this!