Adobe Photoshop Lab

CREATING A PHOTO GALLERY

BUILDING PHOTO GALLERIES IN PORTFOLIO

Learning Objectives

By the end of this lab, you will be able to:

  1. explain the relationship between aspect ratio and resolution
  2. crop and resize images using Photoshop
  3. remove unwanted objects in images using various tools in Photoshop
  4. use Photoshop filters to enhance the look of your images
  5. use Photoshop adjustment layers to non-destructively change the look of your image
  6. create a professional looking photo gallery using modules in Adobe Portfolio

Downloadable Files

If you wish to follow along with the instructional videos, download and extract the zip file containing images and a text file.


COLLECT YOUR IMAGES

The requirements for your photo gallery assignment will vary from professor to professor, but try to shoot the best image possible to help limit the amount of post processing you will need to do. As always, look over the assignment requirements and ask your instructor questions if necessary.


ASPECT RATIO VS RESOLUTION

When working with images and video, understanding the difference between aspect ratio and resolution is important as is how they are related and intertwined. Follow along as the video discusses aspect ratio and resolution and gives examples of when they may be an issue with your work. You can find the files used in the Photoshop lab videos at the top of this lab in the section titled *downloadable files*
aspect ratio vs resolution

Key Points From Video

  1. Aspect ratio describes the relationship between the width and the height of a screen, image, or video. Resolution refers to how many pixels wide and how many pixels tall a screen, image, or video is.
  2. Some common resolutions you are accustomed to seeing or hearing about include ratios like 16:9, 4:3, 3:2, 1:1, and 16:10. Each of these aspect ratios have many resolutions. For example, you may have a monitor with a resolution of 1920 by 1080 and your friend may have a monitor with a resolution of 2560 by 1440. Both of you have monitors with an aspect ratio of 16:9.
  3. It is generally a good idea to edit your images to fit into the container built for them. For example, if you know your image is meant to fit into an area of your site that is 16:9, you would not want to resize the image so it measures 600 by 400 as that would be a 3:2 aspect ratio.
  4. In Adobe Portfolio, your page covers (images used to identify your individual work pages) are set to a specific aspect ratio that can be changed at any time. To see what aspect your page covers are currently set to, open your work page, look in the left hand menu and scroll down until you find the "All Collections" section. Click on the arrow for page covers and choose aspect ratio. You will see the current aspect ratio and can change it to any ratio you desire.
  5. Changing the aspect ratio of an image may mean you will need to permanently crop out a portion of that image. Many examples are given in the video starting at the 8 minute mark.

CROP AND RESIZE YOUR IMAGES

Put your knowledge of aspect ratios and resolution to work. This video will first demonstrate how to crop and resize without worrying about aspect ratios and then demonstrate how to crop to a specific aspect ratio before resizing the image. You can find the files used in the Photoshop lab videos at the top of this lab in the section titled *downloadable files*
photoshop crop and resize

Key Points From Video

  1. Photoshop can be downloaded and installed for free by using your Temple University Adobe Creative Cloud account. Access Creative Cloud by visiting https://creativecloud.adobe.com
  2. When working with photographs in Photoshop, the workspace named Photography is a good one to pick. Access it by clicking on Window...Workspace...Photography.
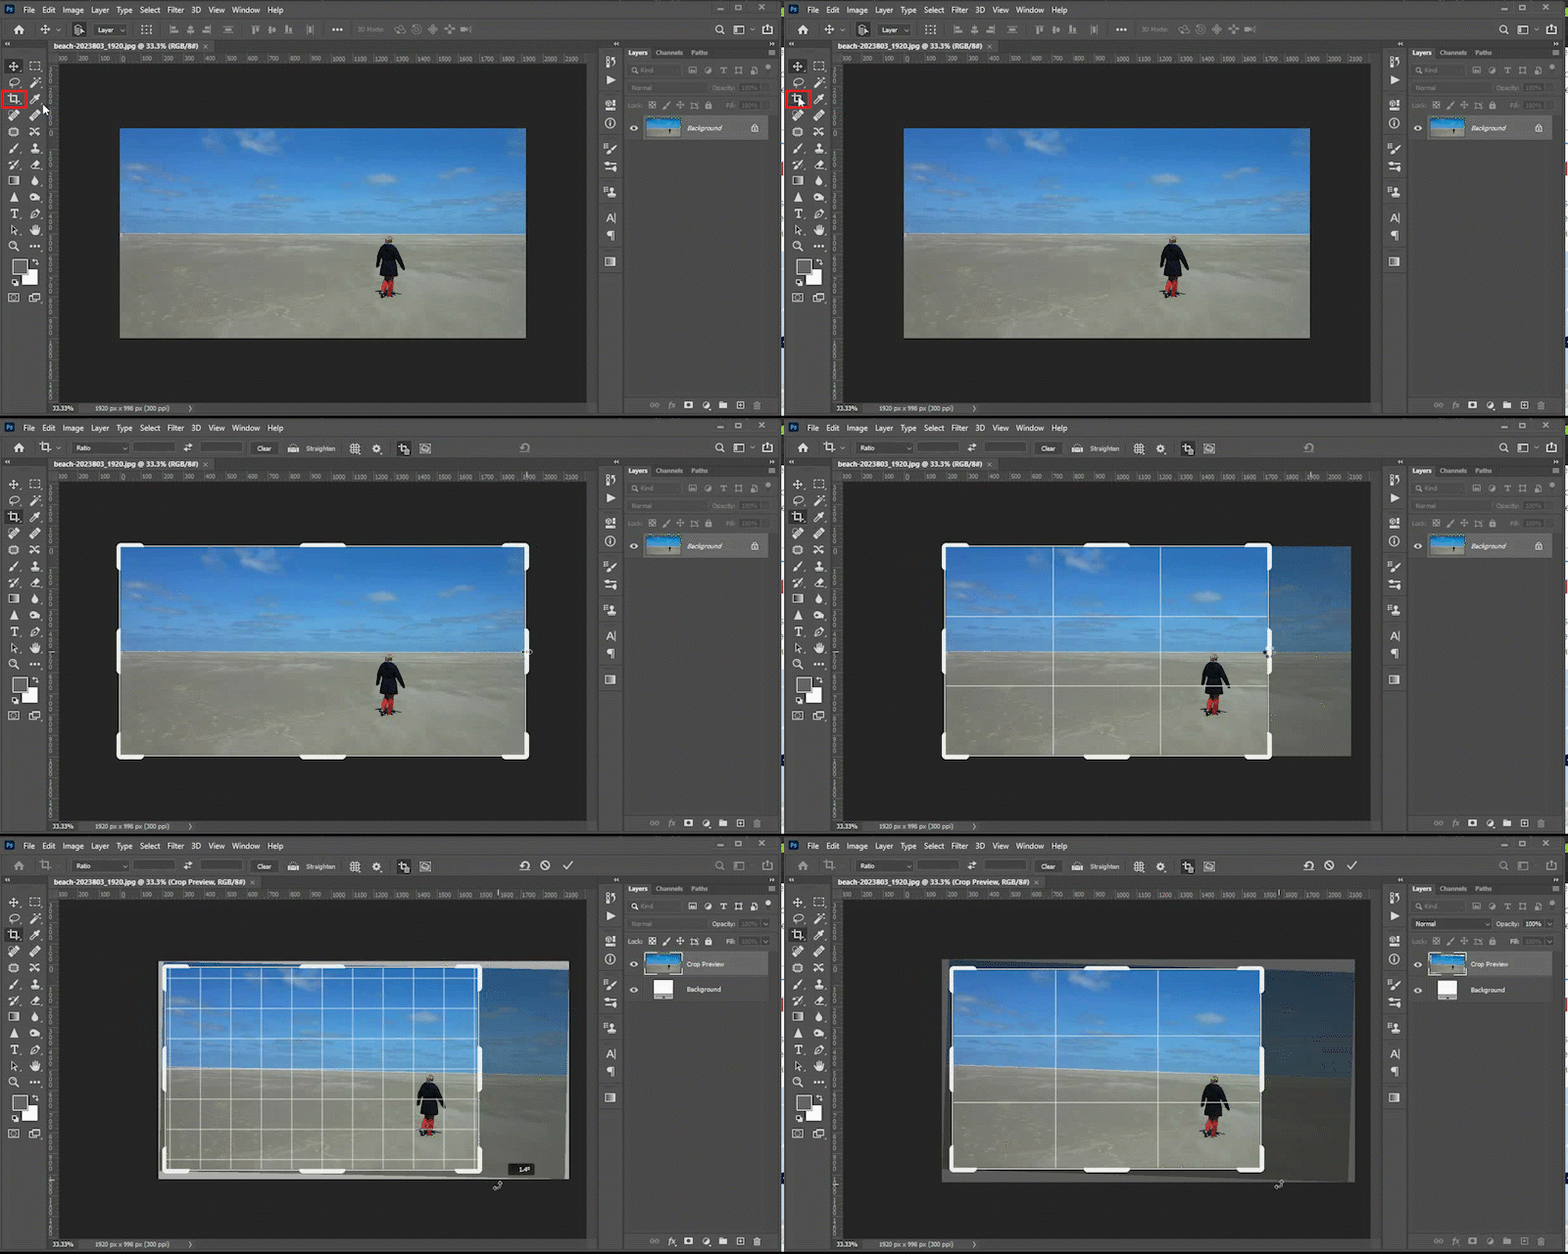
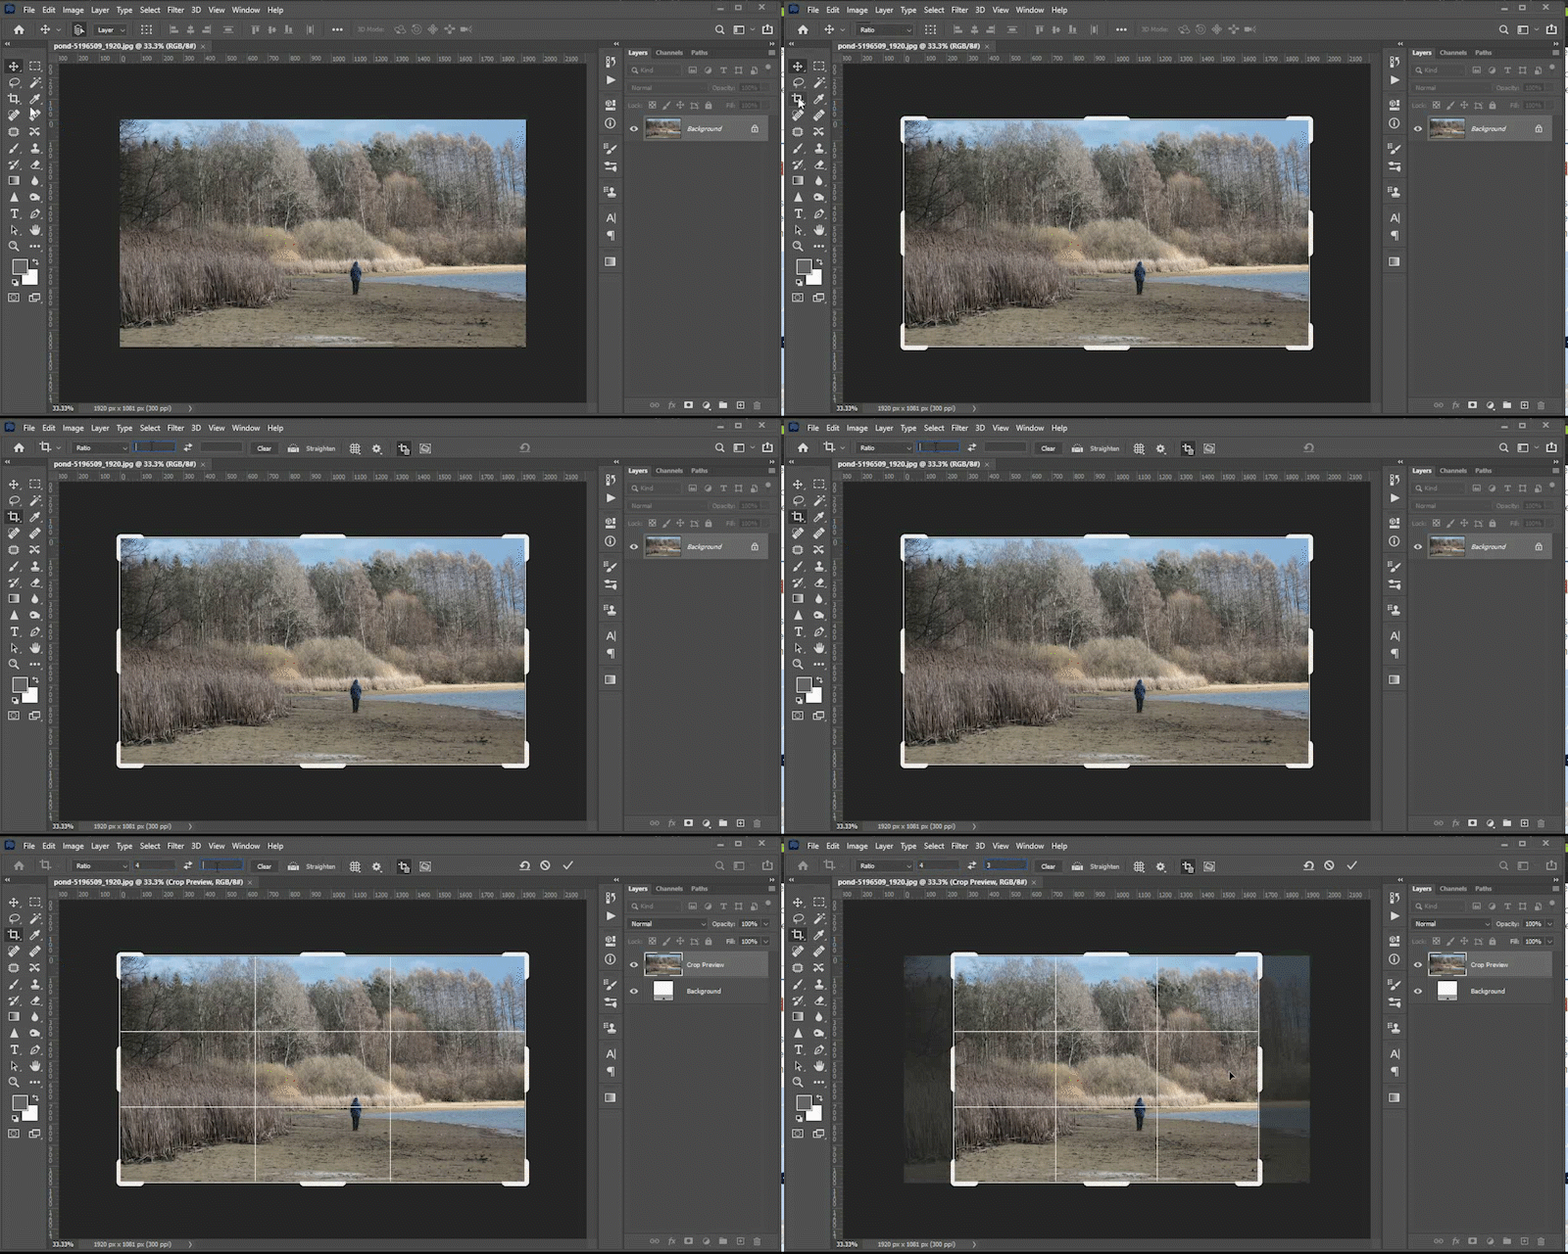
  3. To crop, click on the crop tool and use any of the handles to drag in the window to exclude the portions of the image you no longer want in the frame. You can also use the crop tool to rotate your image by going to any corner of your image to make an adjustment.
  4. crop and rotate
  5. To resize, or change the resolution of, your image, click on Image...Image Size. As long as the chainlink symbol is showing between the width and height dialog boxes, when you change the number in one box, the other number will update to keep the current aspect ratio.
  6. When you save your image as a .jpg, Photoshop will prompt you to choose a quality setting of 0-12 for your image. Higher numbers equal higher quality but also larger file sizes. Lower numbers equal smaller file sizes but also lower quality images.
  7. To crop an image to a specific aspect ratio, click on the crop tool and type in the ratio you wish to use when cropping. Make your crop and then use the image...image size option to change the resolution of your image.
  8. crop to aspect ratio

HIDE, MOVE, AND REPLACE OBJECTS IN YOUR IMAGE

No matter how well you plan, your image may have objects that need to be hidden, moved, or replaced. This video will demonstrate how to use tools like the content aware fill tool, the patch tool, the content aware move tool, and the clone stamp tool to meet those goals. You can find the files used in the Photoshop lab videos at the top of this lab in the section titled *downloadable files*
photoshop tools

Key Points From Video

  1. The content aware fill tool allows you to select the item in your photo you wish to remove and then lets the software figure out what to replace that item with in terms of updating the pixels to replace the item.
  2. The patch tool, like the content aware fill tool, gives you the power to remove unwanted items from your image. However, with the patch tool, you decide which pixels are used to replace your unwanted item.
  3. The content aware move tool allows you to move a selected object around the image without requiring you to make complex selections. It moves your selected object and attempts to edit your image so your moved object looks natural in its new location. The tool also takes the empty spot where your moved object was and attempts to fill it in with elements similar to the area surrounding the empty portion of the image.
  4. The clone stamp tool selects and samples a user chosen portion of an image and uses those pixels to paint over another portion of the image. It can be used to remove a defect or to duplicate a portion of the image.
  5. The video gives multiple examples of these useful Photoshop tools. At times, using a combination of these tools may be required to fix an image with extensive problems.

USING PHOTOSHOP FILTERS TO ENHANCE IMAGES

While there are many filters in Photoshop that can help make your image look its best, this video focuses on the camera raw filter and the blur filter. You can find the files used in the Photoshop lab videos at the top of this lab in the section titled *downloadable files*
photoshop filters

Key Points From Video

  1. The camera raw filter is an extremely powerful and useful filter that should be run on any image before being placed in a photo gallery. The camera raw filter can change your color balance, exposure, contrast, vibrance, saturation, sharpness, color balance, rotation, and so much more.
  2. The blur filter and blur gallery (gives multiple blur filters to play with at once) allows the user to adjust the depth or field of an image and can give an image a dreamy look or focus the attention of the viewer to a specific area of the image.
  3. The video gives multiple examples of these useful Photoshop filters.

USING ADJUSTMENT LAYERS FOR NON-DESTRUCTIVE EDITS

Working non-destructively in Photoshop is a great idea. You never know when you will change your mind about an edit. Adjustment layers can change the tones and colors of your image, but since they are non-destructive, they do not permantly change your pixels and can be quickly turned on and off based on your current preference. Although there are 19 adjustment layers in Photoshop, this video will focus on the black and white adjustment layer and the vibrance adjustment layer. You can find the files used in the Photoshop lab videos at the top of this lab in the section titled *downloadable files*
photoshop adjustment layers

Key Points From Video

  1. All adjustment layers can be found by clicking on the black and white circle icon at the bottom of the layers panel. You can also click on Layer...New Adjustment Layer for 16 of the adjustment layers or click on Layer...New Fill Layer for the last 3 adjustment layers.
  2. If you want to watch a video explaining all 19 adjustment layers, a YouTube user named Dansky has a training video that does exactly that!

ADDING A PHOTO GALLERY TO ADOBE PORTFOLIO

You can build a photo gallery two ways in Adobe Portfolio. The quick and easy way is to use the photo grid module when you create a new page in your work collection. However, your instructor may want you to place each image up one at a time using the image module. Using the image module gives you more control and forces you to think about aspect ration and resolution, so it is likely this is the technique you will be required to use for your assignment. Be sure to ask your instructor if you are unsure of the requirements.

This video will show both techniques and will take the time to remind you about some of the more important features of Photoshop while doing so. The video starts by looking at a professional looking gallery and then attempts to recreate that gallery using the tools found in Portfolio. You can find the files used in the Photoshop lab videos at the top of this lab in the section titled *downloadable files*
Portfolio Photo Gallery

Key Points From Video

  1. You can add a gallery to any page in your portfolio by using the image module or the photo grid module. For your assignment, you will create a new page inside of your work collection.
  2. Using the photo grid module to create a photo gallery gives you the ability to quickly choose and upload any number of images and does the work of arranging those images on the page in a professional manner. Once the photo grid is in place, you can click on the pencil icon for the grid and choose "edit grid". Doing so allows you to drag images around to move them into an order of your choice and gives you the ability to add captions.
  3. Creating a gallery using the image module takes longer and forces you to think about aspect ratios and resolution. The final results of building your gallery this way ofen look better than using a randomized photo grid.
  4. If you want to mix landscape and portrait images together in a gallery created using the image module, you will need to cheat by using a combination of photos and photo grids or by taking a landscape and making something called a diptych or triptych. These issues are discussed at length in the training video.