Adobe Premiere Pro Lab

CREATING A VIDEO

CREATING A VIDEO USING ADOBE PREMIERE PRO

Learning Objectives

By the end of this lab, you will be able to:

  1. identify the 4 main quadrants of the premiere workspace
  2. use the project panel to import media
  3. ensure all video clips are set to the same frame rate
  4. use the source monitor to edit clips and bring the edited clips onto the timeline
  5. add a voice over to one of the audio tracks and arrange the video clips to fit the narrative
  6. using a different audio track, add sound effects to enhance the project
  7. adjust the volume of audio tracks manually or use the ducking feature to have volume adjustments done automatically
  8. use still images on your timeline as part of your video project
  9. use a pan and/or zoom effect to give a still image life
  10. scale video or images to fill the frame and remove black bars when the original aspect ratio does not match your project
  11. color correct your video clips
  12. add text for titles and/or captions and use the effect controls panel to animate the text
  13. add video transitions between clips
  14. export the final video in a format that works and looks great using Portfolio, YouTube, or Vimeo
  15. If you used YouTube or Vimeo, create a hyperlink to your video and embed the video into your Portfolio video page

Downloadable Files

If you wish to follow along with the instructional video, download and extract the zip file containing images, sounds, videos, and a text file. Please note this file is 275 MB, so give it some time to download if you have an average speed Internet connection.


WORKING IN ADOBE PREMIERE PRO

Premiere Pro is a monster program. Some are intimidated as soon as they open the program and see all of the options on the screen! This video will step you through the basics of using Adobe Premiere Pro so you can edit together a great video worth sharing. You can find the files used in the Photoshop lab videos at the top of this lab in the section titled *downloadable files*
adobe premiere pro

Key Points From Video

  1. You can import media files for your project by double clicking in the project panel, locating your project files which are hopefully all in one folder, and then clicking on the import folder button.
  2. After opening your video files folder, you can click on the list view to verify all of the clips are set to the same frame rate. If not, right click a file, and then choose modify...interpret footage. At that point you can edit the frames per second to match what the majority of your footage is using.
adobe premiere pro

Key Points From Video

  1. Double clicking a video file will open it in the source monitor. Using the letter I and letter O keys, you can set the in and out points of the file. Once set, bring the video, audio, or both to the timeline by dragging. You can do this for all of your clips now, or first bring in your voiceover so you can match the video clip to what is being said in the voiceover.
  2. By default, projects start with 3 video tracks and 3 audio tracks. You can drag your voiceover onto any open audio track found on the timeline. Once in place, bring in the rest of the video clips to fill out your story.
adobe premiere pro

Key Points From Video

  1. Add sound effects using another open audio track. You can add additional tracks by right clicking on the name of a track and choosing the option "add track".
  2. You can adjust the volume of audio tracks manually by clicking and dragging the center line of an audio track or you can let the software adjust audio tracks automatically by using the ducking feature discussed in the Audition software package. The ducking option can be found by clicking on the audio panel, choosing essential sound, clicking on edit, and then tagging your music track as music. Jump to 3:20 in the video to see ducking using Premiere in action.
adobe premiere pro

Key Points From Video

  1. Instead of dragging video clips onto the timeline, you can drag in still images. Those images can be given movement by using the effect controls panel and adjusting the scale and position options. Jump to the 2:55 mark in the video to see scaling and positioning at work to create interest but also to get rid of black bars.
  2. You can color correct your video clips and make basic edits such as sharpness, contrast, white balance, and vibrance. These options can be found by opening the color panel and working in the various sections of the color panel. The video discusses these starting at the 10:00 mark of the video.
adobe premiere pro

Key Points From Video

  1. Adding text to use as a title or caption is easy to do with the text tool. Once in place, you can change the size, position, and opacity of the text using the effect controls panel. An example is given at the start of this video. If you need additional help with adding text, you may want to watch this video on adding text in Premiere: https://www.youtube.com/watch?v=Ap_P3y_ZM1U
  2. Video transitions are used to smooth out the connection of going from one clip to the next clip. There are subtle and more in your face transitions available to you in the effects panel. Examples are given starting at the 6:00 mark of the video. If you need additional help with transitions, you may want to watch this video on audio and video transitions: https://www.youtube.com/watch?v=9EgX1OoJ5-E
adobe premiere pro

Key Points From Video

  1. Before closing Premiere, save your project by clicking file...save in order to save the project as a .prproj file. This file is needed in case you wish to update your project in the future.
  2. While it is important to save your overall project file in Premiere, if you want to share this video online you will need to export it out as and .mp4 file and upload it to YouTube or Vimeo. Starting at the 1:30 mark, the video talks about which options should be selected when exporting to ensure the best possible final product.

CREATE A LINK AND EMBED YOUR VIDEO USING PORTFOLIO

Once you export your video in Premiere and upload it to YouTube, you will need to create a new page in Adobe Portfolio. The new page will hold a working hyperlink to your YouTube video and you can embed your video to allow visitors to watch the video without leaving your website.
adobe premiere pro

Key Points From Video

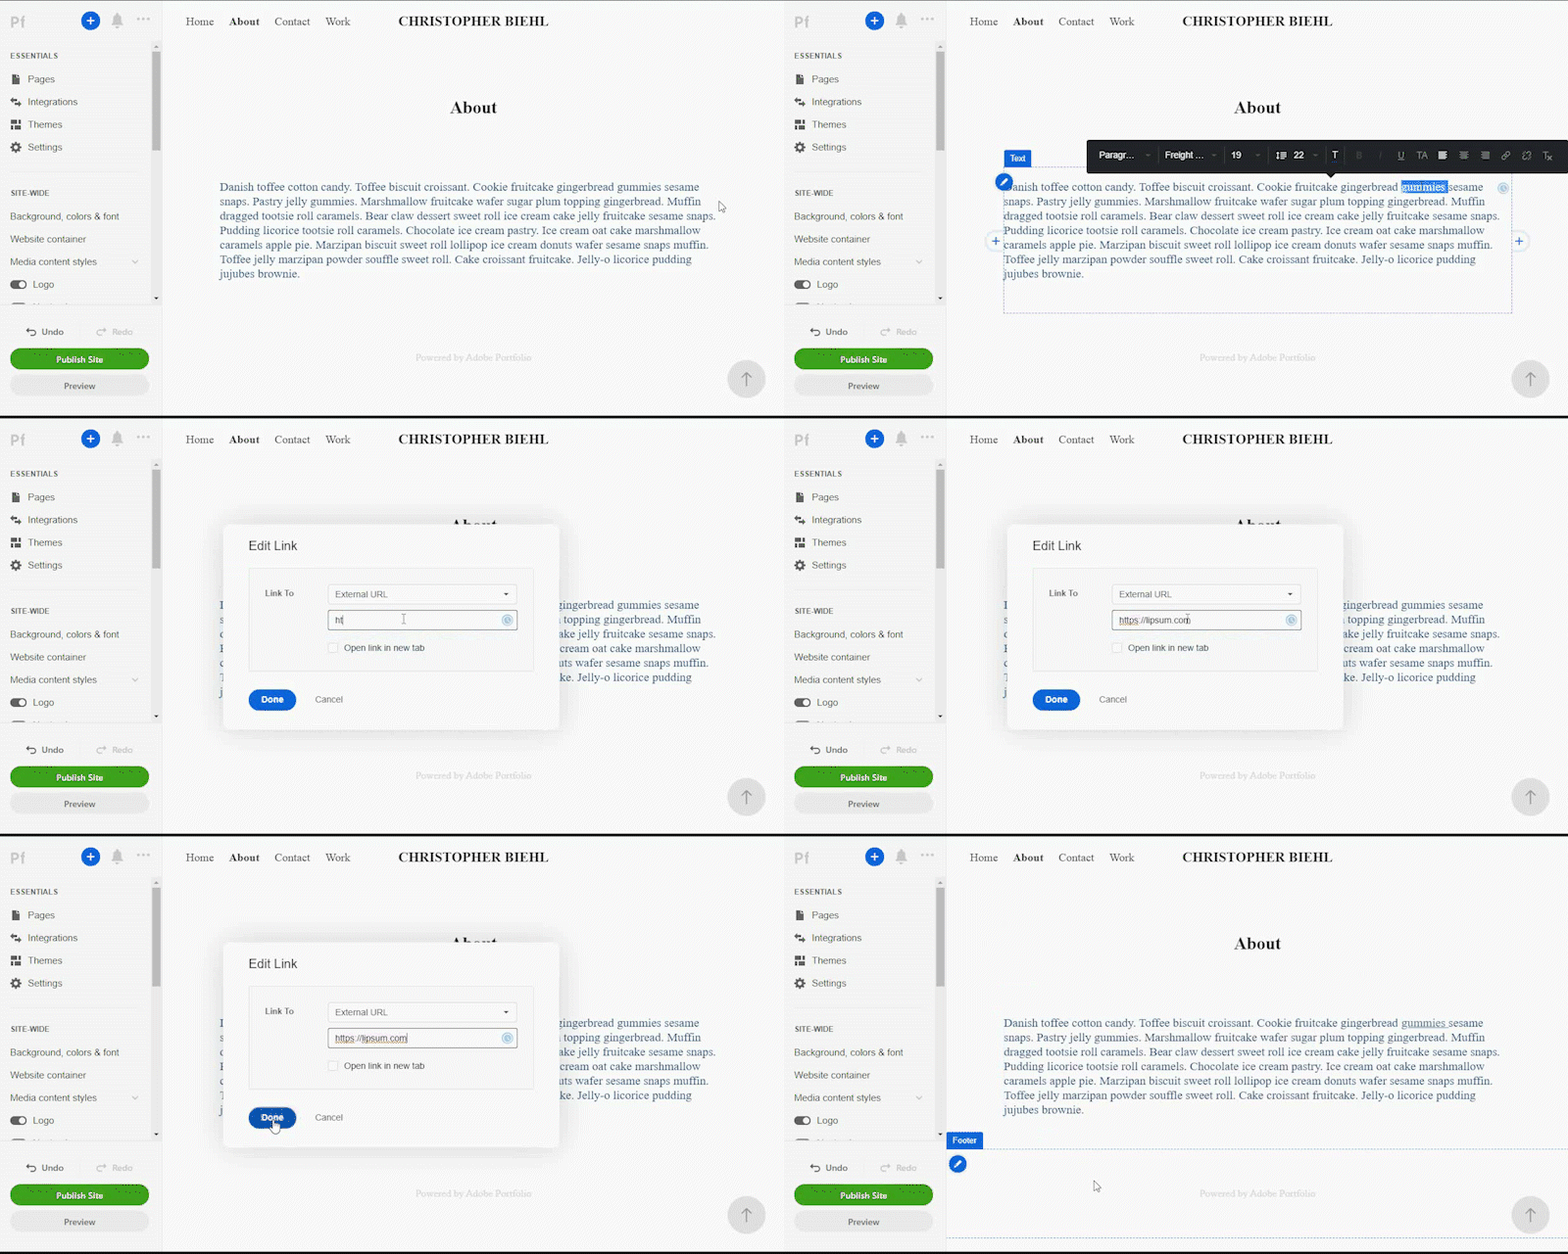
  1. To create an external link using text, highlight some text and click on the chainlink icon to create the link. Choose External URL as your link type and enter the entire URL you wish to visit. You will be given the option to open the page in a new tab.
  2. create an external link
  3. To embed your video, you will need the embed code. Go to YouTube and open your video. Look for the share option under your video and click on it. One option, unless you disabled the embed feature, will be to embed. Once clicked, you will be able to copy the code and paste it into the embed box of Portfolio.
  4. You will have the option to change the dimensions of your video, but make sure you keep the same aspect ratio. The video will show you the math involved to make this work (it is easy math, I promise!)
  5. Don't forget to update the cover art of your new page.